

To say that Reolink Duo is an interesting security camera would be an understatement and that’s because instead of a single lens, there are two 4-megapixel lenses which are able to cover far more ground. And yes, every other technology that Reolink has developed the past few years (such as the smart motion detection and color night vision) is included as well.
| Reolink Duo | |
|---|---|
| Reolink.com | Check Product |
I know that someone will immediately say that the wide-angle cameras that can go up to 360 degrees have been around for many years and it’s true, but the Reolink Duo has an advantage over those cameras. It does not have that annoying fish-eye effect which is cool for artistic videos, but it does not work that great for surveillance purposes. Others may also ask why don’t we just go with two separate cameras, especially since the Reolink Duo does require two channels from an NVR. For at least a couple of reasons. First, it’s the price tag.
At 110 dollars (at the moment of writing), the Reolink Duo has essentially the price of a single camera, so why would you bother buying two? The second reason is the PoE connection. The Reolink Duo uses a single PoE cable, so it’s cleaner and easier to install. And let’s not forget that the camera is built to withstand the elements, so you can install it outdoors without worrying about weather damage. The concept behind the Duo is not entirely new because I have seen it with some Hikvision and Vivotek cameras, but the price tag was almost ten times more. Indeed, there is nothing like the Reolink Duo on the market unless you go way over $1000 dollars, so let’s check out this rather unique device and see how it performs.
Note: Besides the PoE model, the Duo is also available as a wired WiFi version, a WiFi battery-powered camera and a 4G battery-powered variant.
Design and Build Quality
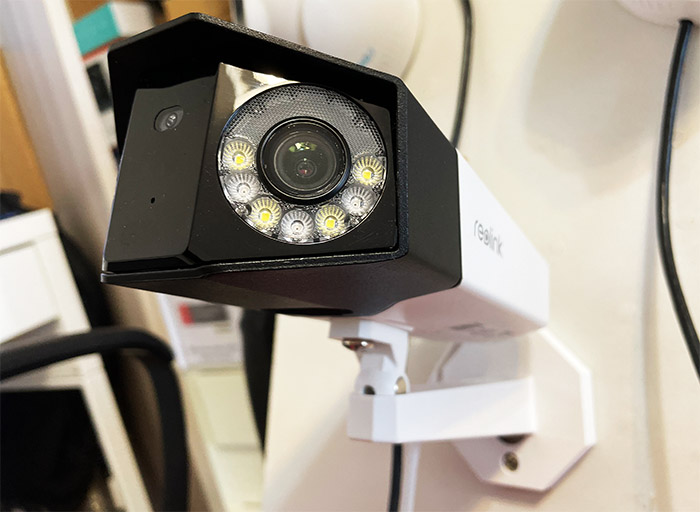
I kind of had an idea of what to expect before opening the package, but I was still surprised by the unique design of the Reolink Duo because it does not look like the regular camera (in a sense, it reminds me of those handheld police radar guns). So, we’re dealing with a mostly plastic case covered by a white matte finish, but near the front, about a quarter of the device is made of a metallic alloy covered by a black matte finish (this area slightly protrudes outwards to remove any potential glaring). On the actual front section of the Reolink Duo, there are many things that are going on. Straight in the middle, there’s a glossy portion that divides the two lens and here, you can see the daylight sensor and the microphone.
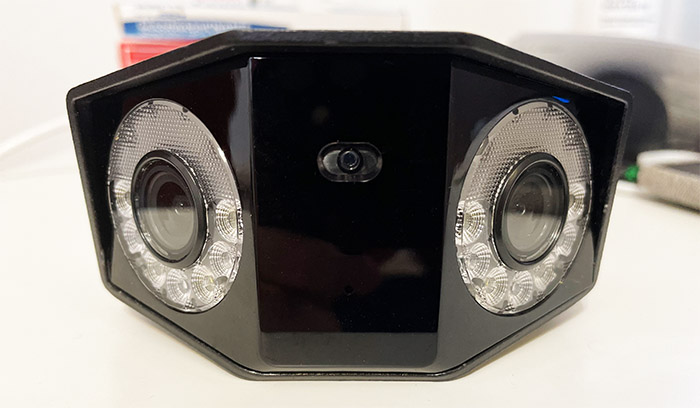
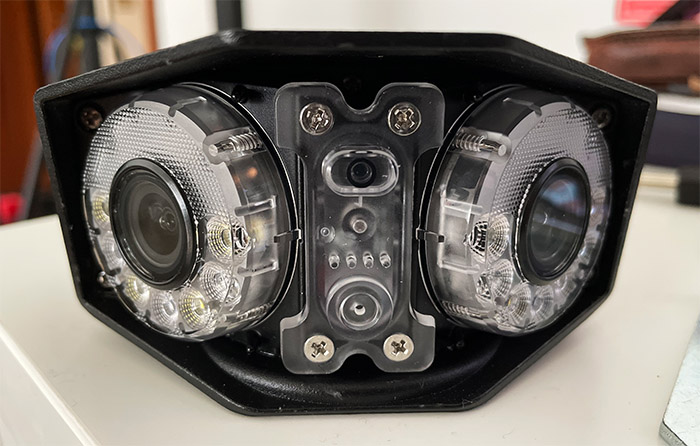
The mike, along with the bottom placed speaker do allow you to both listen and talk to and with anyone that’s in the vicinity of the camera (you can also do random sounds in the middle of the night to freak out your neighbors). On the left and right side of the microphone section, there are two identical lens, each with three IR and four spotlight LEDs (for the colored night vision). Other than that, there is a microSD card slot (supports 256GB!) on the bottom that can be accessed by removing two screws which ensure that no water can enter the enclosure. Indeed, I saw no openings with the exception of the speaker at the bottom which is also protected against water and dust ingress.
This and the silicone band that separates the plastic back and the metallic front do confirm that this camera was build for outdoor use. Not only that, but the Reolink Duo is also IP66-rated which means that the device is dust protected and it will survive jets of water being directed towards the case. So, yes, it should do fine with storms and it should also survive when the temperature moves between 14 and 131 degrees F – it’s not really build for those incredibly harsh winters. Considering that it has two lens, I did expect that the camera would be bigger, but it’s surprisingly compact, measuring 7.7 x 4.1 x 2.2 inches (19.5 x 10.3 x 5.6 cm). Even so, it’s more than enough to be noticeable by any potential trespasser during the day and the spotlight is very bright (6,500K) during the night to discourage anyone from entering your property.
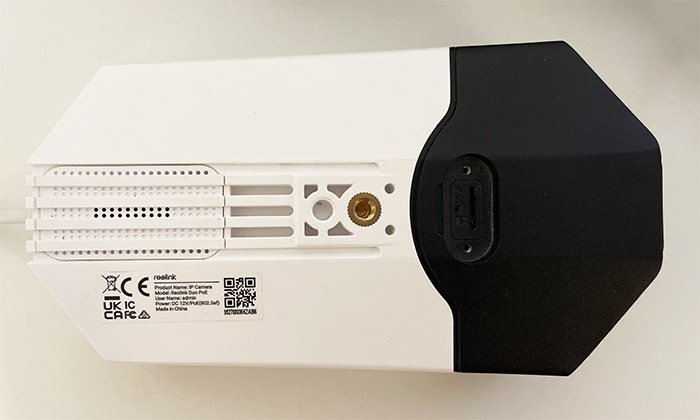
I did find it interesting that there are two mounting holes, one at the top and one at the bottom, so you can attach the stand whichever way you like. The stand is made of plastic and it is designed to allow you to easily mount the camera on the ceiling or on the wall (the adjustments can be made using the provided screwdriver and, as expected, the Duo needs to be manually adjusted, you can’t do it from the app). On the rear side of the security camera, there’s a single cable which bifurcates towards the end, one side allowing the user to connect the Reolink Duo to a power adapter and the other to an Ethernet cable. There is no power cable in the package since the manufacturer wants to persuade you to use PoE and I need to mention that there is a waterproof lid in the package to ensure that the water won’t mess with the connection.
Internal Hardware
Since I have already opened up pretty much all security cameras that I tested so far, I decided to do the same with the Reolink Duo. There were no obvious screws anywhere around the case, so I had to carefully remove the glossy piece of plastic that surrounds the lenses. Doing so will make the camera look far more menacing and will expose the screws that we need to remove. I got out the five screws and I pulled and twisted, but nothing budged.
So, I was left with two options, either force it and risk breaking the camera before even testing it or checking the FCCID official website in the hopes that Reolink has uploaded some internal photos. And I was lucky because I could indeed see the main components there (the camera survived unharmed). That being said, the PoE version of the Reolink Duo is equipped with a Novatek NT98528BG chipset and a FPE 1416101MC IC – the wireless variants have an Atheros AR1521X-CL30 chip.
Installation and App
As I already mentioned, there are two ways to mount the Reolink Duo and you will have to attach the stand accordingly. Use the screwdriver to put it into position and then either use a single Ethernet cable for PoE (if you connect the camera to a Reolink NVR or to a PoE switch) or rely on the CAT cable for the connection to the router and use a separate power cable for powering on the Duo. If it goes outdoors, I do think that it’s better to have a single cable and not deal with a secondary power cable. If you use an NVR, then simply hook up the other end of the Ethernet cable and you should already be able to see the stream, but, if you want to use the proprietary app, then you need to follow a similar set of steps as with the other Reolink cameras.
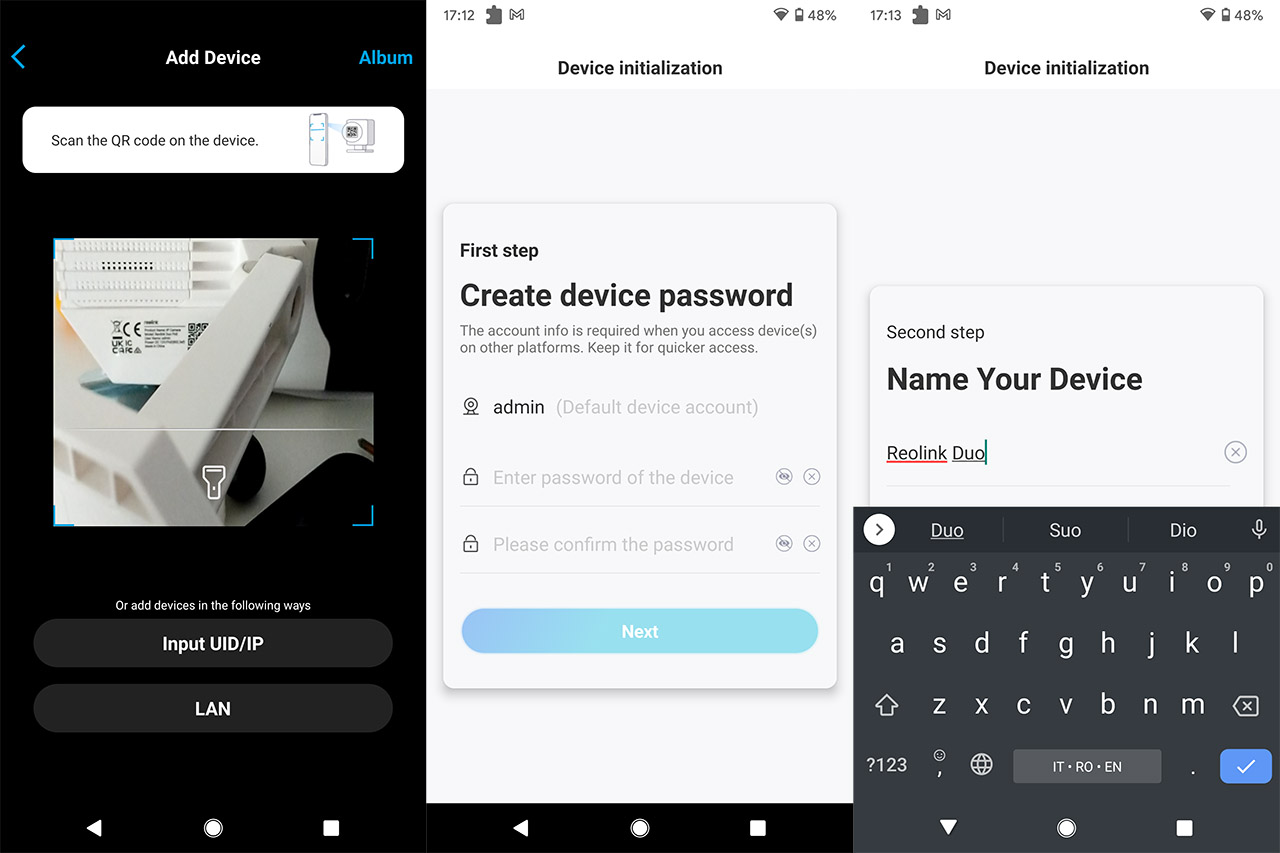
The first step is to create a new account and log into the app and then you need to click on the Plus sign. This will enable the camera on your phone and you will be able to scan the QR code. Afterwards, enter the admin password, set the name of the camera and that’s about it, you can now roam the app. Be aware that in case the Reolink Duo is already connected to an NVR, you will not be able to pair it to the app. The user interface does look a bit different than on other Reolink cameras and that’s because we now have two simultaneous streams coming from a single device. By default, only a single stream will show, but you can switch to both streams by tapping on the icon you see on the top right corner (next to the settings cogwheel).
On this window, you will also be able to check the live bitrate, trigger the audio alarm (in case you see an intruder – the horn is very loud), turn on the spotlight or change the way you see the cameras (you can add more simultaneous streams from different cameras). Underneath the live view, besides some quick action icons (for capturing a photo or a video), you get to adjust the image quality and, the higher you go, the more bandwidth the camera will use (as a single camera, it’s not that much considering the current Internet speed standards). I noticed that in case you decided to see both stream at the same time, the quality would only go up to Moderate – individually, they will still reach 4MP. There’s also the option to Talk through the speaker, clip a specific portion of the footage or check out the Playback section where you get to see the videos that are stored on the microSD card or other storage device.
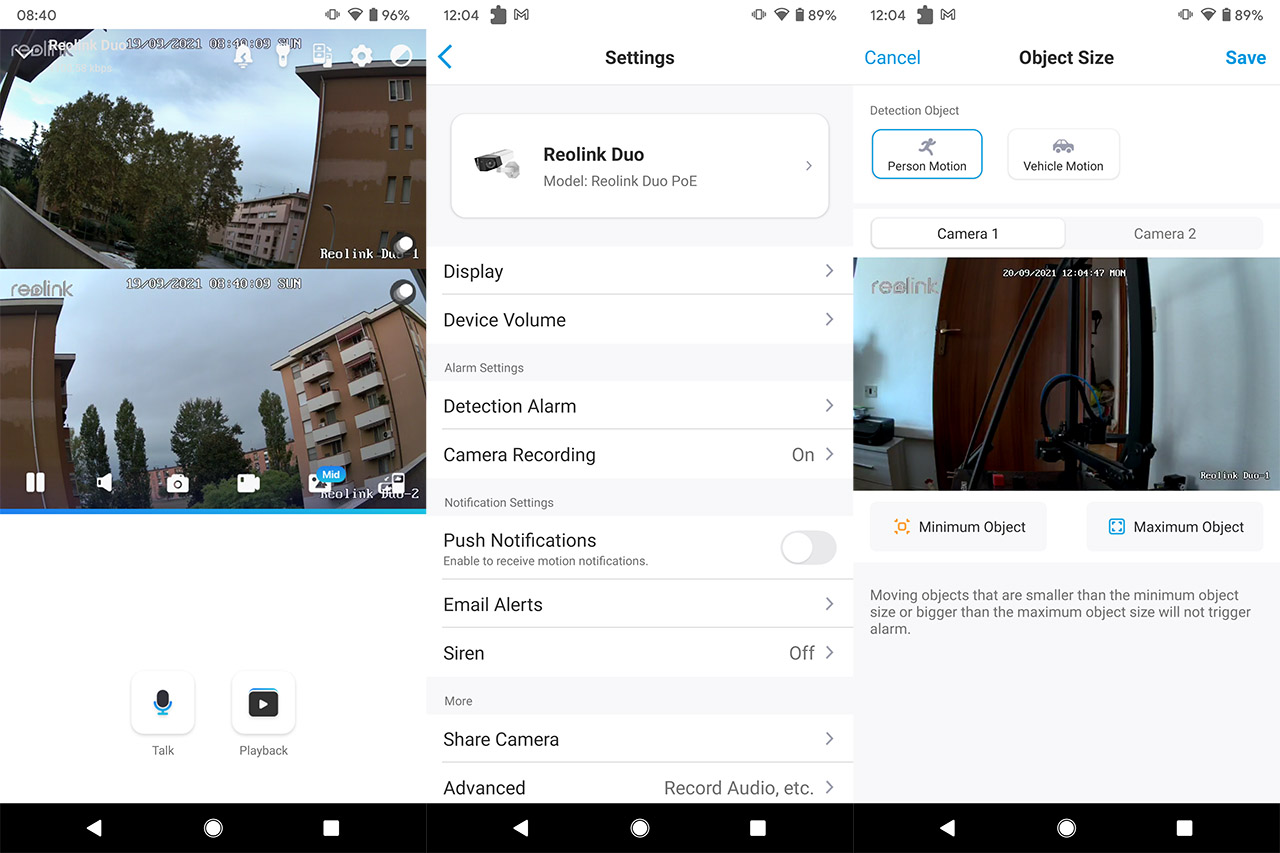
The Settings area is pretty much the same as on other Reolink cameras and to highlight a few features, there’s the possibility to add a privacy mask, to adjust various Display aspects for each lens, to set the brightness of the Spotlight, to disable the IR lights and more.
The Image Quality
The Reolink Duo is equipped with two 4-megapixel sensors that have a maximum resolution of 2560 x 1440 pixels which should be enough to get some fairly crispy images (to expect 4K at this price point and from this type of camera is pushing it a little bit). The first place where I started up the camera was indoors and I immediately noticed that the footage was darker than on the other cameras from Reolink, but I fixed it by moving the Brightness level slightly higher from the app. To get a better point of reference, I took out two other Reolink cameras which has a narrower field of view (80 to 98 degrees horizontally), the RLC-520 and the RLC-522 and I tried to position them in a way as to mimic the viewing angle of the Reolink Duo.
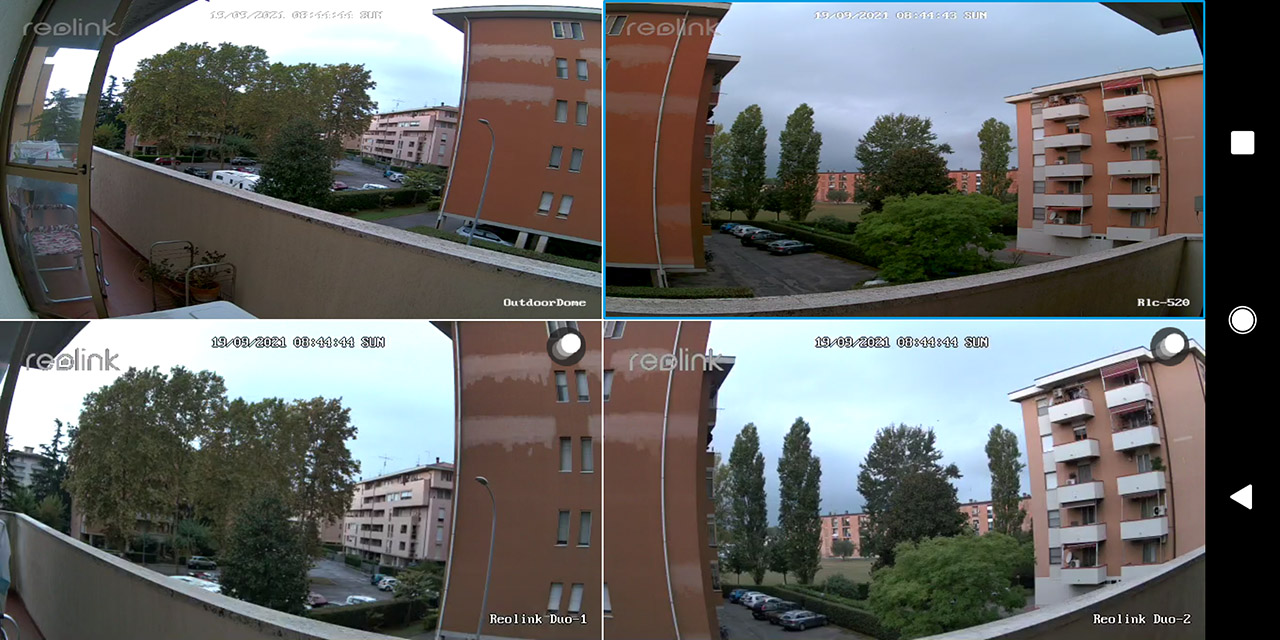
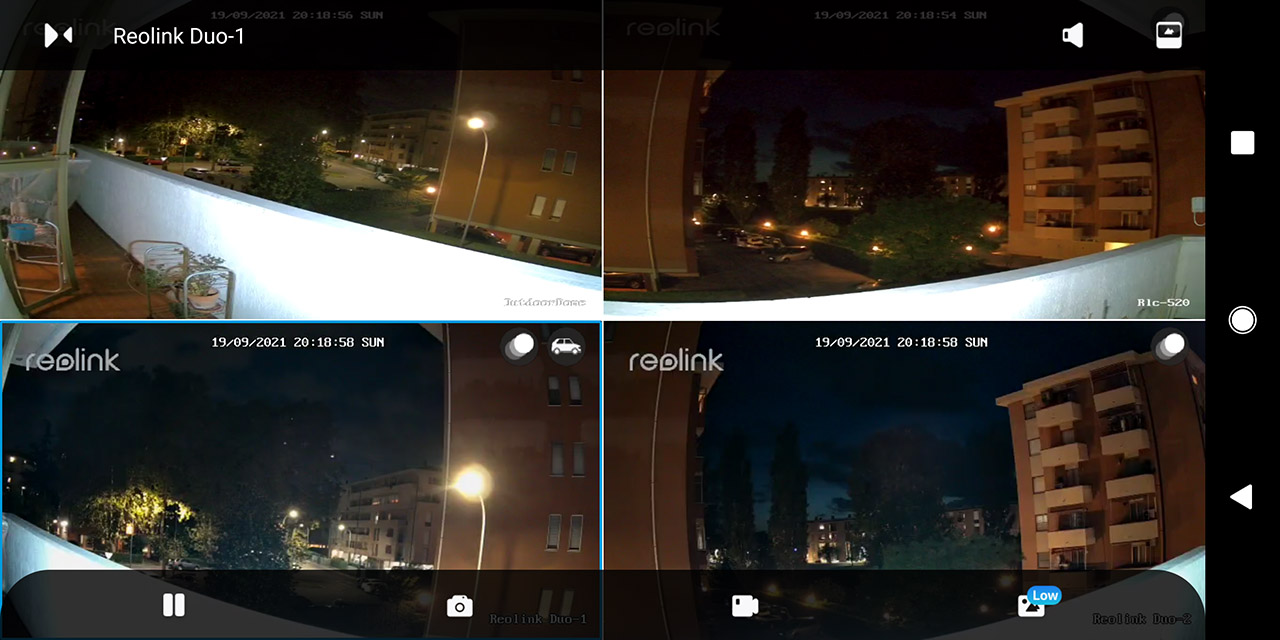
After I considered that I did a good job, I checked the footage from the app. It’s true that I couldn’t set the streaming higher than Low since this was the only way to see them all at the same time, but even so, the differences were quite obvious. The advantages of the Duo is that it has less distortions at the edges, while the RLC-520 and the RLC-522 curved the view a lot more. But, the 4MP vs 5MP is also quite obvious here because the Reolink Duo is visibly less sharp both indoors and outdoors.
As you can see from the video, the building in front (which is about 130 feet away) is well defined and the colors are fairly accurate – the footage from Reolink cameras is usually a bit more contrasty. But, a bit more in the distance, things get less defined, so the front of your house, a few feet from your porch is usually a good place to point the camera at. If you need to go farther and even zoom into a specific spot, then you need to check other models, such as the Reolink RLC-811A which will also show the footage in 4K. As you can see from the screenshots, the two cameras (RLC-520 and RLC-522) do cover a bit more ground, but it’s not a very perceptible difference.
I can’t deny that those extra 28 degrees can make a difference, but in most cases, the 150 degrees of the Reolink Duo should be enough to secure one part of a building. After the night came, I took the trio of cameras outside again and pointed it out at the building in front of me. As you can see, the three IR sensors may not be enough to get a very clear night-time footage and this is something that I saw on the previous generation of Annke cameras (including the 4K C800) which were also a bit low on IR LEDs. The light sources seem to be the main culprit since the camera overblows them a bit, allowing some noticeable noise to creep into the scene.
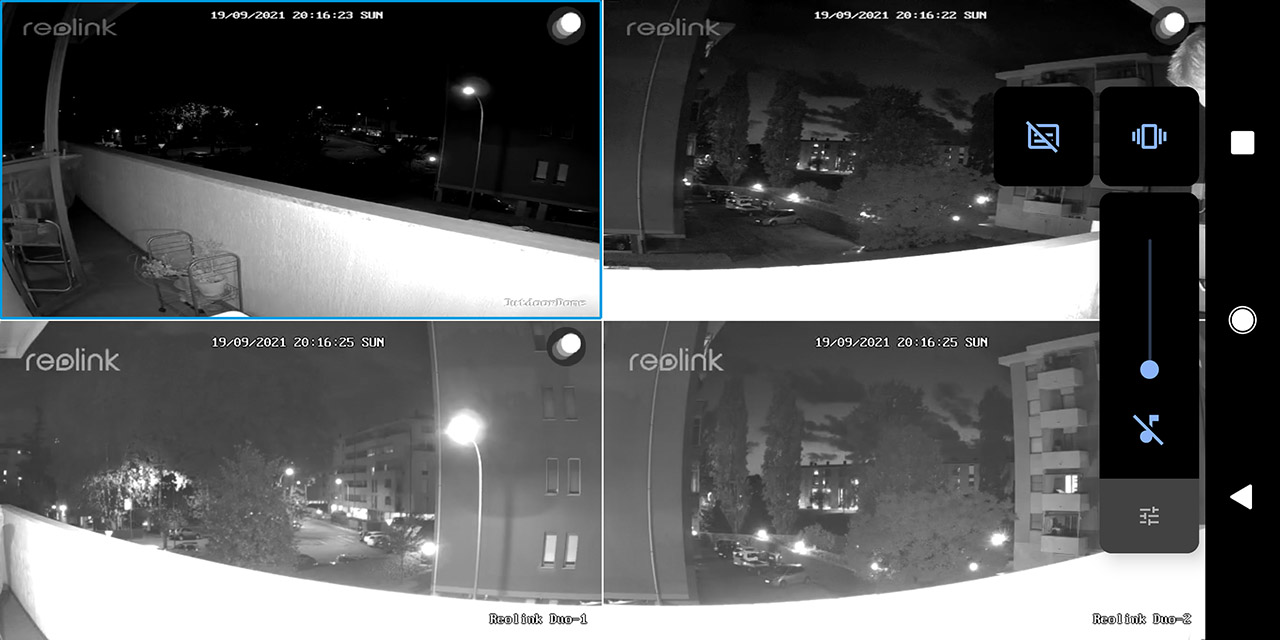
I also enabled the spotlight and again saw that the image wasn’t as clear as I would have liked. And then I remembered that I pushed the brightness up for the indoor filming. After turning it down a bit, the image quality improved quite a bit and it resembles more the RLC-522’s performance (which is the best out of all three cameras). Still, the 4MP sensor is struggling a bit to keep everything clear at over 300 feet which is to be expected (up to 100 feet, everything is very clear). Keep in mind that this is a screenshot that was captured with the image quality set at the minimum, since that’s the only way to see the stream from all three cameras at the same time (from the app). The funny thing was that the RLC-520 also gained colored night vision due to the powerful spotlight of the Reolink Duo.
Smart Motion Detection
We were introduced to the smart motion detection about a year ago and it has immediately proven to be an incredibly useful feature. Besides being a local service (no need to connect to external servers where you privacy is no longer guaranteed), this technology is able to accurately tell when there are moving cars and when people are passing in front of the camera. I have seen it in action on the RLC-510A, the RLC-520A and the RLC-811A, and it worked really well, being able to detect moving people up to 100 feet in the distance. The sensor would also always focus on a person and ignore any moving car, even if the person is on a bike. And I was wondering whether walking towards the camera with your hands in the pocket would trick the camera, but it seems that it could still tell that someone was moving in front of the lens.
Perhaps the only way one can avoid being detected by the camera is if it’s pitch black outside, but even so, the Reolink Duo does have a powerful spotlight to help in this regard. So yes, the performance of the smart motion detection is essentially the same as with the other Reolink cameras that have this technology implemented. But the interesting thing is that each camera would work independently to detect humans and vehicles, so, if the sensor is triggered, both cameras would start filming.
Pages: 1 2